This week's inspiring blog post was written by the fabulous Bex Partridge who runs the wonderfully floral Instagram account @botanical_tales . The perfect place for flower lovers to feel inspired. Browse our Wreath Refill Posies in our Christmas flowers collection.
I’ve always enjoyed making wreaths and floral displays, since the days when my mum used to fill our house with foliage at Christmas time. Since then, I’ve developed my own style which I would describe as whimsical, nature inspired and imperfectly perfect.

When the Real Flower Company contacted me to ask me if I would like to try out their Posy Refills I was delighted. I normally forage for the majority of my wreath contents, in part because this is my style, but also because I find it hard to source good quality, natural flowers in my area so it was a real treat to have the opportunity to play with these beautiful blooms. The posy refills have been designed to be used to replenish an existing floral wreath when the blooms are beginning to fade as well as for those of us that like to make our own wreaths.
I received the Nordic posy, a beautiful combination of creams and greens with a splash of black and white from the anemones and painted birch twigs.
![IMG_7665[2]](https://www.realflowers.co.uk/wp/wp-content/uploads/2016/12/IMG_76652-1.jpg)
Here's how I used it to create a wreath...
What you will need:
1 x Real Flower Company Posy Refill of your choice
At least 3 different types of foliage (there is plenty to be found in the hedgerows)
Oasis
Embroidery hoops/wire rings
Floral tape
Floral wire
Scissors
Ribbon
Getting Started
Because this wreath was to contain real flowers, I wanted to find an alternative to the traditional oasis ring that better suited my style. I am on the constant look out for inspiration whether that be in shops, when gardening or walking with my boys. I happened to have a couple of embroidery hoops that I thought could make the ideal base for this wreath and with that in mind, set out on my task.

Once I had worked out how to attach a small slice of oasis (which I pre-soaked for half an hour in a bowl of water) to the two hoops, I began by building a strong base using eucalyptus, laurel and holme oak leaves. For a wreath such as this, where the design builds from the centre, I find it best to gradually build up from that point, ensuring each side is balanced. I secured the foliage branches to the hoops using floral tape, which is wondrous in the way it holds branches so tightly. Where possible I made sure the foliage was inserted into the oasis but in all honesty this is not essential as it will take some time to fade.

Something I find really useful is to frequently hang the wreath as you go along to check the balance and positioning of your foliage and flowers, there is nothing worse than getting to the end and realising your wreath hangs wonky! This is however less important if you are making a traditional full circle wreath.
The next step is to start introducing the smaller flowers such as wax flowers and your berries, if using. These act as a softener to the green of the foliage. I have chosen to use closed buds of winter flowering viburnum that will open as the days go by and smell gorgeous as well as some birch twigs complete with catkins as a nod to spring.

Once you have a solid base you can now move on to the larger blooms. In this posy you will find exquisite roses (full size and sprigs) with the headiest of scents and stunning anemone alongside delicate heads of ammi. Roses have strong stems so there is no need to wire but anemone and ammi will benefit from the added strength. Because re-inserting stems can cause damage, I always at this point roughly position the heads of the flowers around the wreath. This allows you to get an idea of how they will look. I find as a rule that groups of odd numbers of flowers (vs even) is more aesthetically pleasing. Once happy, check that all foliage and flowers are secure in either the oasis or attached to the hoop (if using). This is now the time to hang the wreath and take a step back. Tweak where necessary, add or take out until you are happy with your creation.
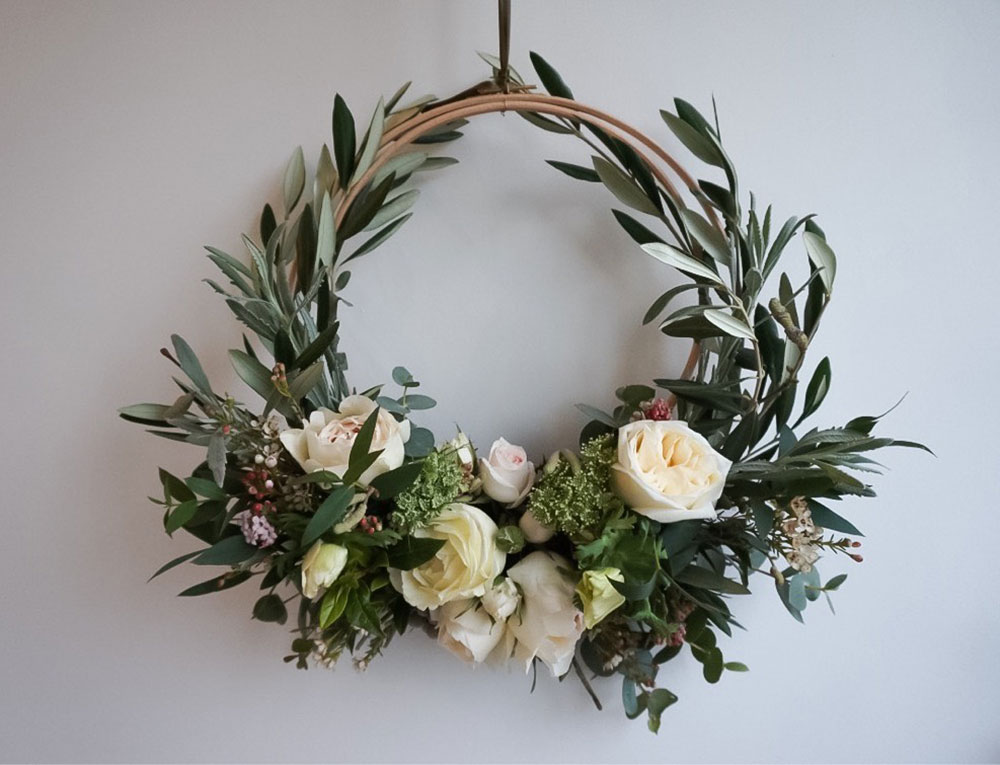
For the final touch, select a beautiful, simple ribbon from which to hang the wreath and sit back and admire with all your senses!
Whilst it seems a shame to hang the wreath outside as it’ll look so gorgeous, the cold will help with the longevity of the flowers. Having said that, I do have a habit of moving my wreaths around so I can enjoy them to their maximum! Once your flowers have faded you can always refresh with new blooms or more foliage.
A final word, believe in yourself
A friend said to me recently whilst she was wreath building with me for the first time, that she didn’t know where to start or end. This made me smile, so I explained to her that to me this is the beauty in wreath building. If whilst you’re building something doesn’t look right, it is so simple to adjust and fix things. I am a firm believer that the imperfections in our work are what give us personality – how boring a world would it be if we all did the same, perfectly?